
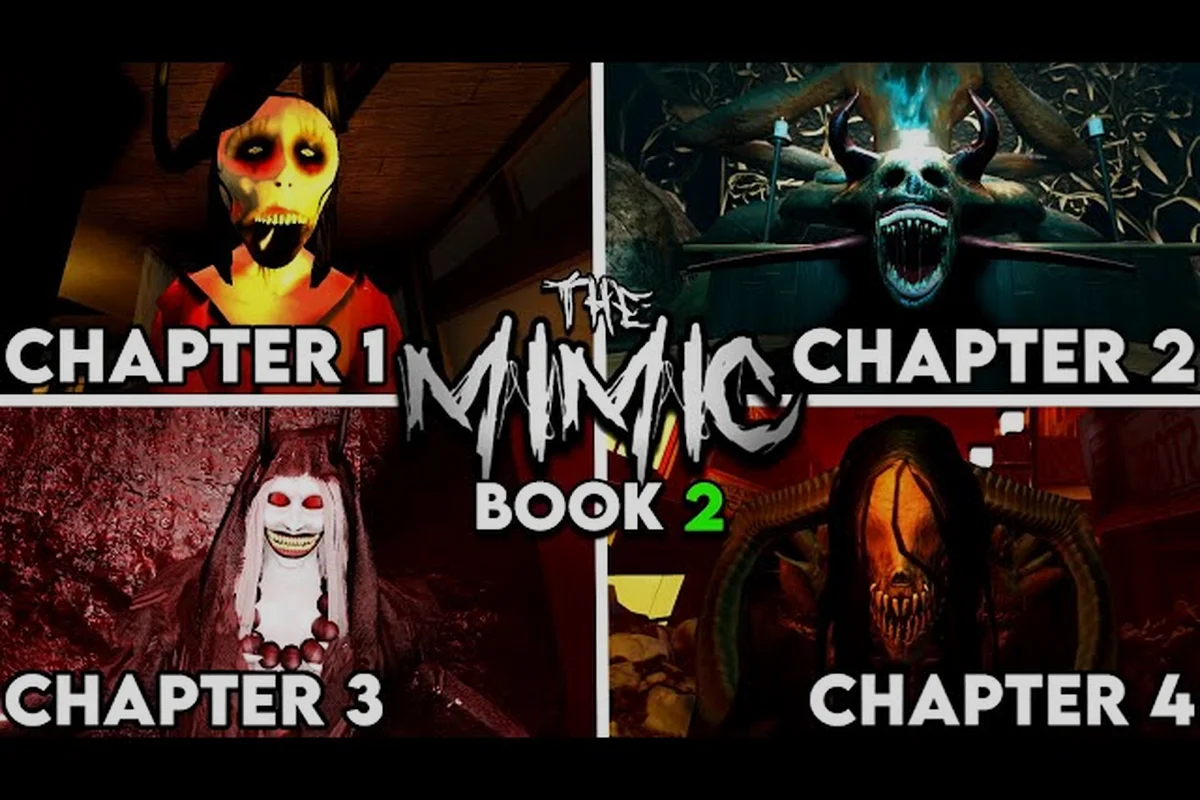
The Mimic everything you need to know begins with four storybooks, tense objectives, and consequences for careless movement. Master the movement controls, objective order, inventory rules, and co-op restrictions before starting, because the Mimic reacts to noise, missed cues, and unexplained anomalies rather than simply following a checklist. Learning how clues trigger pursuit, how co-op players divide tasks, and which storybook objectives unlock later content will make the first run easier to interpret and far less punishing.
The Mimic Everything You Need to Know About the Core Experience
The Mimic is a horror adventure built around investigation, stealth, puzzle-solving, and the tension of being noticed by a dangerous creature. Each of its four storybooks presents a distinct protagonist and setting, but the central loop remains consistent: explore a hostile location, identify the current objective, gather required items or keys, and reach the next exit before the environment becomes unsurvivable.
That basic loop matters because The Mimic is not a passive walking simulator. Players who wander without a clear purpose usually waste stamina, miss collectible requirements, and walk directly into patrol routes. A focused first session should establish Objective Tracking, Resource Awareness, and Exit Planning before it attempts anything risky.
| Core element | What it adds | New-player priority |
|---|---|---|
| Storybooks | Separate protagonists, locations, conflicts, and chapters | Learn one book at a time |
| Creature encounters | Constant pressure from a pursuing or patrolling threat | Listen before entering rooms |
| Collectible tasks | Rewards for completing optional environmental searches | Check corners and side rooms |
| Multiplayer | Shared objectives with faster communication and coordination | Assign clear responsibilities |
| Difficulty modes | Different balances for stealth, speed, and mistakes | Start with a forgiving mode |
| Story clues | Lore delivered through objects, dialogue, and discoveries | Save major revelations for later |
The Four-Book Structure
The game is divided into four connected storybooks: Control, Jealousy, Rage, and Rebirth. They follow different characters, but recurring people, objects, locations, and decisions create a larger narrative. You do not need to understand every reference before starting; trying to decode every mystery on the first playthrough often slows down the more immediate objective.
A better approach is to separate Immediate Goals from Long-Term Questions. Immediate goals include finding a key, collecting an item, opening a specific door, or reaching a marker. Long-term questions concern the hidden connections among the books and the identity of recurring figures. Complete the chapter objective first, then revisit the clues after the immediate danger has passed.
| Storybook | Protagonist focus | Experience for a newcomer |
|---|---|---|
| Control | Order, authority, and institutional pressure | Strong entry point for objective-focused play |
| Jealousy | Suspicion, strained relationships, and hidden motives | Emphasizes observation and reading the environment |
| Rage | Conflict, resistance, and escalating confrontation | Rewards decisive movement and careful resource use |
| Rebirth | Consequences, transformation, and later synthesis | Best understood after the earlier storybooks |
The chapter order matters because later books may contain references that only make sense with earlier context. If you want a more structured first session, use The Mimic first-hour guide to plan unlocks and early objectives without treating every unexplained clue as a blocker.
What Success Looks Like in Each Run
A successful run depends on balancing the Mimic’s required objective with stamina management, escape readiness, and optional rewards. For example, completing the core task while collecting key documents or lore clues may create a longer route through a hostile area, so players must decide whether the added information is worth the risk of entering the escape phase with depleted resources. These trade-offs produce several valid performance goals:
-
Efficient Completion: Finish quickly with the required task completed.
-
Complete Collection: Gather every optional item, even if the route takes longer.
-
Stealth Run: Avoid detection whenever possible and conserve resources.
-
Team Run: Divide tasks so everyone contributes without splitting up unsafely.
-
Lore Run: Examine dialogue and environmental details while still progressing.
These goals can conflict. A player chasing collectibles may need to revisit a dangerous area, while a player rushing the exit may leave behind optional rewards. The best route is the one that fits your chosen goal rather than the one with the fastest movement speed on paper.
The Mimic Tutorial for Movement, Interaction, and Survival
The control system is designed to make movement, observation, and resource management compete for attention. Sprinting is useful, but constant sprinting can leave a player vulnerable when stamina runs low. Likewise, rushing into an unfamiliar room can reveal the creature too late for a quiet retreat. The safest rhythm is usually Pause, Scan, Move, Listen.
Players should treat sound and sight as separate information channels. A visible creature is easy to understand, but a sound behind a closed door may indicate a patrol, a scripted event, or an opportunity to move in the opposite direction. The environment becomes more readable once you stop focusing exclusively on the marker ahead.
| Action | Best use | Common mistake |
|---|---|---|
| Walk | Careful exploration and listening | Moving too slowly without checking angles |
| Sprint | Crossing exposed ground or escaping | Running without a destination |
| Crouch or hide | Avoiding detection when available | Hiding without confirming the danger passed |
| Interact | Collecting items, using keys, opening doors | Rushing interactions during a patrol |
| Turn or look | Checking corners and patrol direction | Assuming the room is empty |
| Use a consumable | Recovering during a difficult encounter | Saving every resource until it is too late |
Movement and Camera Habits
Camera control is just as important as keyboard input. Before opening a door, turn the view toward the new space rather than walking straight through. This gives you time to identify a creature, a patrol, or a useful collectible. When entering wide rooms, check the nearest corners first because a straight line across the center can expose you to threats that a short reposition would avoid.
Positioning is another essential skill. Do not stand in the middle of a doorway, because enemies and teammates can block your route. If a hiding place is available, use it only after confirming that it matches the encounter rather than as an automatic response to every danger. Sometimes moving around a patrol is safer than squeezing into a locker while another player waits nearby.
Stamina, Noise, and Environmental Awareness
Stamina is a limited survival resource, not merely a sprint meter. If you spend it crossing the map or fleeing a chase, you may not have enough left to react to a second threat. Many players report that the safest habit is to Reserve Stamina for Escape: move at a sustainable pace, and accelerate only when a route or threat justifies the cost.
Noise works similarly well. Doors, sudden movement, and running can expose your position even when no creature has direct line of sight. Slowing down near doors and corners reduces both physical and visual risk. For a detailed breakdown of resource management, the The Mimic survival guide explains how stamina, hiding, and safe routes work together.
A Reliable First-Run Routine
Use this routine whenever a chapter feels difficult: pause before crossing a doorway, then run a quick objective check so you know whether the next task requires an item, key, destination, or interaction. In The Mimic, a false turn can reveal a patrol, trigger a chase, or waste a co-op teammate’s time, so a brief room scan is usually faster than recovering from a bad route.
-
Read the objective: Determine whether you need an item, a key, a destination, or an interaction.
-
Map the immediate room: Note entrances, exits, furniture, and possible patrol paths.
-
Listen before committing: Pause near a doorway when the room is quiet but the route beyond it is unknown.
-
Collect efficiently: Take nearby required items first, then optional rewards if the route remains safe.
-
Preserve an exit: Keep one usable path open, especially during collection sequences.
-
Save dangerous exploration: Approach hidden rooms only after the primary route is understood.
This routine cannot remove every mistake, but it prevents avoidable route errors by keeping the objective, patrol risk, and escape route visible at once. In The Mimic, a failed doorway check may expose a patrolling monster, force a chase, or make a co-op teammate retrace a dangerous corridor. For example, one player can secure the key while the other monitors the room and preserves the exit, avoiding the common cycle of searching for the same required item across multiple rooms.
The Mimic Keybinds and Settings: Build a Comfortable Setup
The Mimic keybinds should place the most frequent actions where they are easy to reach while keeping movement separate from menu commands. Because control layouts can vary by platform, client, or account settings, verify the active bindings inside the game rather than assuming the default arrangement. The goal of this The Mimic tutorial section is not to claim one universal layout; it is to build a setup that suits your hand position and play style.
A reliable layout usually follows three principles: movement keys stay near the left hand, interaction and camera controls sit close to movement, and communication or menu actions do not overlap with emergency commands. If a key requires a difficult reach or causes accidental activation, move it before beginning a difficult chapter.
| Control category | Placement goal | Comfort test |
|---|---|---|
| Movement | Under the left hand | Can you change direction without looking? |
| Camera | Beside movement | Can you turn while keeping your character centered? |
| Interaction | Near movement or camera | Can you collect or open without awkward reach? |
| Sprint | Easy to press but distinct | Can you hold it without accidental activation? |
| Hide or special action | Deliberate but reachable | Can you press it under pressure? |
| Chat or quick commands | Separate from action keys | Can you type without interfering with play? |
Choosing Keyboard or Mouse Layout
Keyboard-only movement can feel precise for players who prefer exact directional input, while mouse movement may feel more fluid in tense encounters. Neither approach is inherently superior. Test each in a low-risk environment and compare how quickly you can turn, stop, and interact.
The practical question is whether the layout lets you perform three actions without hesitation: escape, look around, and interact. If moving the mouse while using the keyboard causes accidental camera movement, increase mouse sensitivity or adjust the control options until the direction feels intentional.
Performance and Accessibility Settings
For most systems, the largest performance cost comes from resolution, shadow quality, effects, and view distance rather than one isolated setting. Prioritize changes that preserve The Mimic’s threat-recognition cues: if patrol silhouettes, audio warnings, or environmental details become harder to read, restore the previous quality level even if the frame rate improves. In co-op, a steady baseline is more valuable than a higher peak frame rate, because unstable rendering can obscure Mimics and delay reactions during encounters. Start with these priorities:
-
Resolution Scale: Keep it high enough for threat recognition, but lower it if frame stability suffers.
-
Shadows: Reduce shadow quality if the scene remains readable and the frame rate improves.
-
Effects: Lower particle density or other effects in visually busy areas.
-
View Distance: Trim distant geometry when performance is limited.
-
Frame Rate Cap: Match the cap to a stable target so the game does not fluctuate between values.
-
Brightness and Contrast: Increase clarity in dark corridors, since a technically attractive image is less useful if you cannot identify a patrol.
A repeatable testing method is more valuable than a universal preset. Change one setting, test the same route, and record whether detection cues remain visible. The advanced The Mimic guide provides room for deeper optimization once the basic setup is stable.
Keybinds for Co-op
Multiplayer adds communication commands, pings, and possibly character or equipment actions. Keep those inputs separate from crouching or sprinting, because a communication command during a chase can accidentally change movement state. If the game offers a quick-mark system, assign it to a key that does not interfere with frequent actions.
Test these layouts in a safe room with another player before attempting a mission. One player should move while the other checks every binding for pings, status indicators, and communication commands, including whether activating them changes crouching or sprinting. For example, if the ping key overlaps with crouch, a player may accidentally stop moving during a chase; separating those inputs keeps the objective from failing because of a simple key conflict.
The Mimic Co-op Guide for Roles, Communication, and Recovery
The Mimic co-op guide focuses on one principle: cooperation should reduce confusion, not multiply it. A team that splits up can cover more ground, but it also creates separate patrol exposure, longer return routes, and unclear responsibility for keys and consumables. Before starting, agree on a shared route and identify who handles each objective category.
| Team role | Primary responsibility | Best contribution |
|---|---|---|
| Pathfinder | Scans routes and identifies threats | Reduces exploration time |
| Objective specialist | Tracks items, keys, and interactions | Prevents missed requirements |
| Watcher | Listens and monitors nearby rooms | Catches approaching danger |
| Support player | Manages healing or recovery resources | Supports injured teammates |
| Flexible runner | Handles optional tasks or alternate routes | Fills temporary gaps |
Assign Roles Without Creating Distance
Choose roles based on the current mission rather than locking one player into the same task for the entire chapter. If two players have strong navigation skills, one can lead while the other covers the rear. If an objective requires solo interaction, a teammate can watch the doorway without wandering into another room.
Communication should use short, concrete statements: location, danger, and action. “Creature left” is more useful than “it’s over there,” while “key secured, move to east hall” gives everyone a next step. Avoid stacking multiple ping and voice systems at once, because redundant alerts can obscure the important information.
Share Collectibles and Responsibility
Keys, special items, consumables, and optional collectibles should have clear ownership. One player may carry the key while another carries the recovery item, but the group should say so explicitly. If a teammate goes down, the team needs to know which objective remains possible and whether the next step requires returning to them.
Cooperation becomes much more reliable when the team keeps these rules simple, because every command in The Mimic can cost time or reveal the party to danger. If one player carries a dungeon key while another holds a recovery item, the group should confirm the split before entering the next room. For example, when a teammate is downed by a Mimic, everyone should know whether the remaining key can still open the exit or whether the team must rescue them before continuing, preventing a failed objective caused by unclear ownership.
-
One route leader: The leader proposes the next destination.
-
One threat caller: The player who notices danger calls it clearly.
-
One inventory reminder: Someone tracks keys and consumables before moving on.
-
One retrieval plan: The team agrees what happens when a player is separated.
-
No silent pickups: Rare or required items are announced immediately.
In solo play, these rules can become personal keybinds and mental checklists for The Mimic: the inventory reminder becomes a quick check of dungeon keys, recovery items, and consumables before opening the next door, while the route leader’s role shifts to comparing the safest path with the exit. Practicing these habits alone makes a later co-op run easier, because a player who already announces required-item pickups and downed-player contingencies can coordinate with teammates without waiting for orders.
When a Teammate Falls Behind
Do not repeatedly ping a distant teammate if doing so reveals your position. Mark the intended route once, then work on the current objective. If the teammate is separated by a locked route, decide whether waiting is safer than leaving the objective unattended.
The most common team mistake is chasing every possible clue at once. Choose a required objective, identify the safest nearby route, and complete it before widening the search. A focused party guide for The Mimic can help with role assignments, common team errors, and ways to adapt to different group sizes.
Turning a failed attempt into one measurable change
Failure creates useful information. Note where the group first lost control of the encounter, whether stamina was depleted, and whether a key was collected before the mistake. Change one variable on the next attempt instead of making several uncertain adjustments at once.
Useful recovery choices include waiting for the patrol to pass, taking the longer room to avoid direct contact, using a consumable earlier, or assigning a watcher before the objective room. These changes preserve momentum and make the next run more diagnosable.
The Mimic Story, Creatures, and Collectibles Worth Watching For
The story of The Mimic unfolds through four books, and attentive players can notice recurring names, symbols, and locations long before the larger mystery is explained. The objective remains practical, but environmental storytelling rewards curiosity. Objects may seem decorative during a first run, yet their placement can connect the institutional setting of Control with the family and identity conflicts explored later.
Distinguishing Story Clues From Routine Items
A story clue is an object that receives unusual attention through dialogue, examination text, lighting, placement, or repetition. A routine item usually supports the immediate chapter objective or collection set. If an object appears in a sealed or thematically important location, take a closer look before leaving.
| Observation | Likely purpose | Player response |
|---|---|---|
| Repeated family name | Character or relationship clue | Note the name and associated person |
| Unusual writing or symbol | Mystery or mythology clue | Examine before advancing |
| Same object across books | Continuity or hidden pattern | Compare it with earlier sightings |
| Contradictory testimony | Unreliable character or competing account | Record both versions |
| Rare collectible placement | Optional lore or reward | Inspect the surrounding environment |
Remember the difference between a confirmed fact and player interpretation. Dialogue may establish that someone recognizes an object, but a community theory about its origin remains speculation until the game supports it. This distinction prevents theories from becoming false “facts” while still making observation rewarding.
Learning the Creature Threat Patterns
Creatures differ by chapter and encounter, but the useful lesson is behavioral. A creature may patrol, react to sound, guard an area, or become more dangerous when it detects a player. Identifying what triggers detection helps the team decide whether to hide, redirect, sprint, or wait.
| Threat behavior | Immediate response | Longer-term adjustment |
|---|---|---|
| Regular patrol | Mark timing and route | Cross behind the patrol |
| Sound reaction | Walk near doors and floors | Avoid unnecessary sprinting |
| Area control | Find an alternate entrance | Preserve stamina for a detour |
| Detection chase | Break sight and relocate | Save a consumable for recovery |
| Ambush near objectives | Clear the room before interacting | Pair players at the doorway |
Use The Mimic monsters list as a visual catalog when identifying an unfamiliar creature, then compare its silhouette with the behavior observed during the encounter. A recognizable outline can flag a likely threat, but patrol routes, sound reactions, and detection cues determine the response: for example, a creature that turns toward a closing door may need distraction, while one guarding an objective should be bypassed through an alternate entrance. This combination of visual reference and live observation turns The Mimic monster recognition into a practical co-op decision rather than a simple visual check.
Collectibles and Optional Exploration
Collectibles reward attention to side spaces, unusual objects, and incomplete rooms. However, optional exploration is most efficient when you follow a consistent sweep pattern. Check behind accessible obstacles, inspect rooms that are larger than the corridor network suggests, and revisit locked areas after obtaining the proper key.
Do not let a collectible checklist turn a safe route into a dangerous one. If an optional search pulls the group far from the main path, finish nearby discoveries first and save remote areas for a deliberate expedition. The goal is to add exploration to a successful run rather than replace its primary objective with endless searching.
The Story’s Place Across the Books
Control introduces the school’s atmosphere and the conflict between personal choices and institutional authority. Jealousy shifts attention toward mistrust and concealed motives. Rage raises the emotional and physical stakes, while Rebirth connects the consequences of earlier events to the game’s broader identity mystery.
That progression explains why the four books feel different without becoming disconnected. Each changes the perspective, setting, and central pressure, but recurring details allow careful players to compare events across chapters. Finish a book before relying heavily on theory, then return to the clues with the benefit of later context.
A Practical The Mimic Preparation Checklist Before Your First Run
A strong preparation routine is short, repeatable, and focused on the next objective. Before entering a room, identify what success requires, what can go wrong, and what route remains available. This checklist is designed for The Mimic everything you need to know, combining setup, mechanics, story, and multiplayer into one practical routine.
Before the Session
-
Confirm your Control Layout, including movement, camera, interaction, sprint, and communication.
-
Choose a difficulty that matches your familiarity rather than your confidence alone.
-
Adjust Resolution Scale, shadows, effects, and brightness until threats remain readable.
-
Learn which action opens menus or communication so it does not interrupt movement.
-
Review the current chapter objective if you are returning to an unfinished run.
During the Chapter
-
Scan Before Entry: Check the room, doorway, and likely patrol path.
-
Listen Before Moving: A silent area may conceal a threat rather than indicating safety.
-
Reserve Stamina: Keep enough capacity to retreat from a bad position.
-
Track Requirements: Confirm keys, collectibles, and interaction items before leaving.
-
Protect the Exit: Avoid standing directly inside a door or narrow passage.
-
Announce Changes: Tell teammates when an objective, item, or route changes.
When Danger Appears
-
Break sight and change position instead of running in a straight line.
-
Use cover only when it matches the encounter and cannot trap you.
-
Call out the creature’s direction and closest teammate.
-
Do not spend every recovery item on the first injury if the team still has an objective to complete.
-
Retreat only as a group when the safe route is not available.
| Preparation area | New-player action | Result |
|---|---|---|
| Controls | Verify every binding in the settings menu | Fewer accidental actions |
| Settings | Test one visual setting at a time | Stable, readable performance |
| Navigation | Learn objective and collectible tracking | Less backtracking |
| Survival | Practice conserving stamina | Better escape options |
| Co-op | Agree on roles and callouts | Fewer wasted objectives |
| Story | Record meaningful clues | Stronger cross-book discoveries |
Learning Pace and Replay Goals
You do not need to complete The Mimic perfectly on the first attempt. The early game is designed to expose mistakes under pressure, and repeating a difficult section is often faster than abandoning the entire run. Use community reports about particular encounters only as directional advice, because platform behavior and difficulty settings can change the result.
The best replay goal depends on your interests. Try a collectible-focused run after completing the required objectives, test a stricter stealth style, or bring a friend who can cover another role. Each goal exercises a different part of the game without changing the basic rules.
The central takeaway is simple: The Mimic rewards deliberate movement, clear communication, and attention to what the environment is telling you. Master the objective and exit route, preserve resources for surprises, treat every storybook as a distinct challenge, and let the four connected narratives reveal themselves gradually.
Frequently Asked Questions
What should a new player know before starting The Mimic?
New players should understand the four-book structure, objective tracking, stamina limits, and the importance of listening before entering rooms. Each chapter has a main task plus optional collectibles, while the surrounding threat can punish rushing or splitting up. A short rehearsal in a forgiving difficulty is more valuable than memorizing every item before the first run.
What are the most useful The Mimic keybinds to adjust?
The most useful adjustments place movement and camera controls within comfortable reach, separate sprint from quick communication, and prevent interaction or menu keys from overlapping. Players using a mouse should test camera sensitivity because a sharp turn may expose a patrol while a slow turn may waste valuable reaction time. Verify the active layout in the settings menu.
Can The Mimic be played successfully in co-op?
Yes, because co-op supports shared objectives and faster communication, but teammates still need a shared route and clear responsibilities. Assign one person to track required items, one to monitor danger, and agree on what happens when someone falls behind. Teams improve faster when they avoid covering every possible route at the same time.
Is hiding always the safest response to a monster?
No, because hiding may waste time or place you in a poor position when the route ahead is also controlled. Moving away from the threat, waiting for a patrol to pass, or approaching from another angle can be better. Use hiding when the space is secure, the danger passes, and your group has a clear plan for resuming the objective.
Should players collect every optional item during the first run?
Collecting everything is not necessary for a successful first playthrough, and chasing optional rewards can make a simple route dangerous. Prioritize required objectives and reliable escape routes first. Return for optional items when you understand the chapter layout, know where patrols repeat, and can move through the area without wasting stamina.